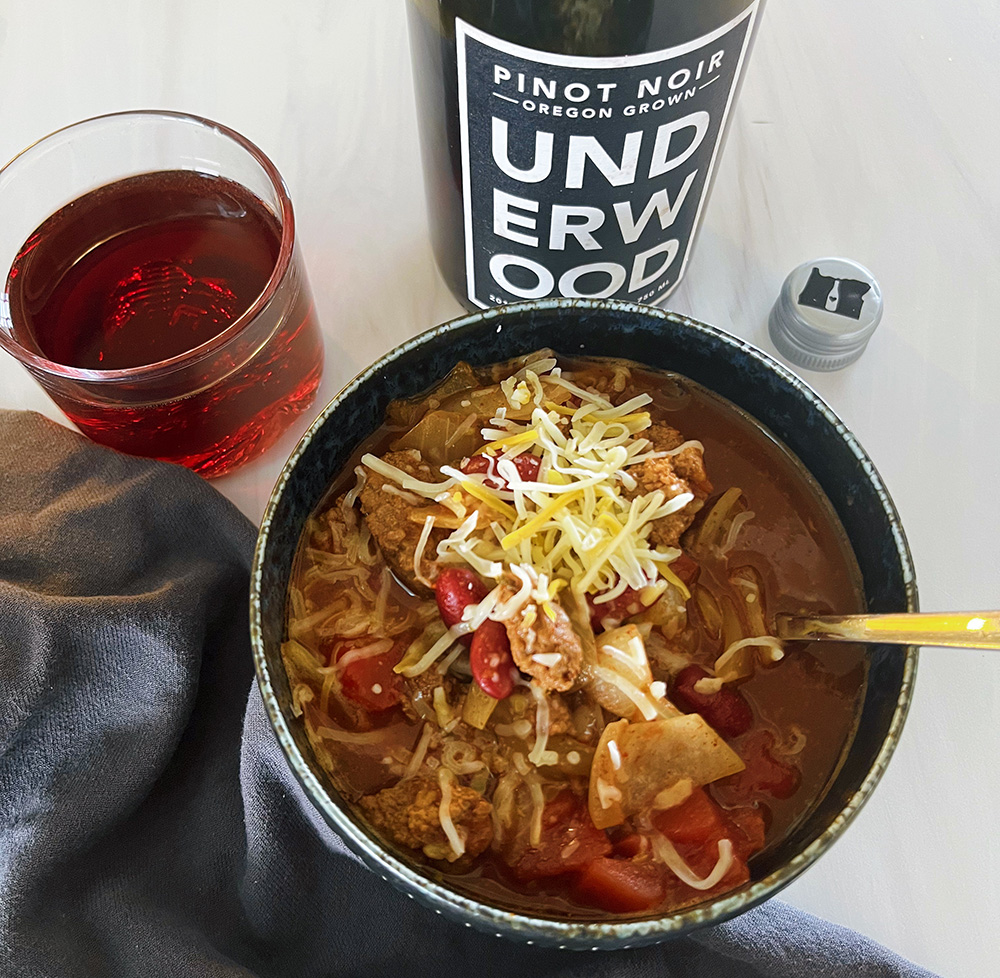
A Bubbles Cocktail to Celebrate the End of 2021

Underwood Bubbles Cocktail

It’s December 1st and we kind of can’t believe it. The year has been another wild one, but we still have a lot to celebrate. All of the fruit that came in for our 2021 vintage was incredible, the harvest had its bumps but was still one for the record books. We love kicking off the final month of the year with our Underwood Bubbles and here’s a cocktail to help you get through the end of 2021. Enjoy one today and keep this cocktail in your back pocket to ring in 2022.

St. Germain Bubbles Cocktail

1 ounce (2 tablespoons) St. Germain

1 ounce (2 tablespoons) gin

1/2 ounce (1 tablespoon) lemon juice

1/2 ounce (1 tablespoon) simple syrup

3 ounces (6 tablespoons) Underwood The Bubbles (about 1/2 glass)*

Underwood Wine Cocktail

Place St. Germain, gin, lemon juice, and syrup in a cocktail shaker with ice. Shake 15 seconds until cold. Strain the liquid into a glass of your choice.

Top off the glass with Bubbles (no need to measure). Garnish and serve. (Note: You can also make a large batch of St. Germain, gin, lemon juice, and syrup ahead if desired, then measure out 6 tablespoons per glass.)

Underwood The Bubbles St Germain Cocktail

Cocktail by A Couple Cooks

Photography by Nicole Morrison

A Vegan Thanksgiving

Vegan Thanksgiving with Underwood Nouveau

Whether this is your first vegan Thanksgiving, or you’re a ‘seasoned’ vegan professional, there are endless ways to enjoy Thanksgiving while ditching the meat. Our favorite Thanksgiving meal is always paired with the right wine, and our limited release Underwood Nouveau Pinot Noir pairs well with meat or meatless turkey, herbs like thyme and rosemary, and any roasted or mashed root vegetable.

Our Underwood Nouveau is a riff on a Beaujolais Nouveau, which is traditionally made from Gamay grapes in the Beaujolais region of France. Always looking for an Oregon angle, we decided to use our Pinot Noir grapes in the Underwood Nouveau for a fresh take on our traditional Pinot noir. The Gamay grape is actually a cousin of the Pinot Noir grape and flourishes in very similar climates.

Nouveau is known for being a fresh, fruity wine that celebrates the first pour of the season. 2021 is our third vintage and it’s our favorite so far. As a reminder, all of our wines are vegan and gluten-free. Enjoy!

Vegan Thanksgiving Salad

MARSHALL’S BRUSSELS SPROUT SALAD

INGREDIENTS:

½ pound brussels sprouts

½ lemon, juiced

½ cup olive oil

3 tablespoons Marshall’s Red Chili Lime sauce

2 tablespoons red wine vinegar

salt and pepper, to taste

4 cups mixed lettuce

2 mixed-color snacking peppers or bell, diced

1 cup spiced nuts* (see below)

Shaved parmesan for garnish (substitute Violife for vegan parmesan)

PREPARATION:

Clean and thinly slice the brussels sprouts.

In the bottom of a large bowl, whisk together the lemon juice, olive oil, and hot sauce, season with salt and pepper.

Pour the dressing over the brussels and toss to coat. Let sit for 10 minutes. Add the lettuce, peppers, nuts, and cheese and toss to combine.

*Easy spiced nuts: 2 cups of your fave nuts (I used hazelnuts and cashews), roast at 350° for 15 minutes, let cool, and toss with 1 teaspoon of olive oil, and 1 teaspoon sweet paprika, ½ teaspoon Marshall’s Volcano Sparkle, 1 teaspoon kosher salt.

Vegan Thanksgiving Mashed Potatoes

VEGAN MASHED POTATOES

(inspired by JULIE PIATT’S recipe)

INGREDIENTS:

2 heads cauliflower

15 medium potatoes – a mix of Russet and Yukon Gold

2 cups vegan mayo – Follow Your Heart or similar

1 stick vegan butter – Miyoko’s or similar

1 head roasted garlic

2 tablespoons sea salt

PREPARATION:

Slice the top half of garlic so tops of cloves are exposed. Drizzle olive oil and salt on top.

Replace top of garlic head. Wrap in aluminum foil and bake at 350° for 45-60 minutes, or until golden in color and soft.

Fill a large pot with water to 3/4 full.

Add the potatoes to the pot and boil on high until they are soft. For Instant Pot users, cut potatoes in half, add ¼-1/2 cup of water to bottom of pot, sit potatoes on steamer rack in pot, cook on high for 12 minutes. Let rest 3-5 minutes then manually release pressure.

In a separate large steamer pot, steam the heads of cauliflower until they are very soft and translucent. Instant Pot users, similar to potatoes but cook for 2-3 minutes on high.

For those who prefer to remove potato skins—empty the potatoes into a strainer, drain the water and gently rub the potato skins off with your thumbs under a cool stream of water. Omit step 4 if you prefer to leave skins on.

Combine potatoes and cauliflower into one pot and mash well.  Add all other ingredients and continue mashing until desired texture is reached and all ingredients are combined.

Add more salt, butter, or mayo as needed. Enjoy!

Vegan Thanksgiving Gravy

VEGAN MUSHROOM GRAVY

INGREDIENTS

½cup extra-virgin olive oil

½small onion, finely chopped (1/2 cup)

4-6ounces cremini mushrooms, finely chopped

½cup all-purpose flour

4 to 5cups vegan vegetable stock, preferably homemade but vegan bouillon cubes will work•1teaspoon soy sauce, more to taste

½teaspoon kosher salt

¼teaspoon black pepper

1 tablespoon light miso

PREPARATION:

In a large skillet, heat oil over medium-high heat. Add onion and mushrooms; cook, stirring, until well browned, 8 to 10 minutes.

Sprinkle in flour and cook, stirring, until golden brown, 3 to 5 minutes. Slowly whisk in vegetable stock, a little at a time, until a smooth sauce forms. Simmer for 2 to 3 minutes until thickened. Season with soy sauce, miso, salt, and pepper.

For a smooth texture, blend in a high-speed blender. For chunkier grave, serve as-is, or pass it through a fine-mesh strainer.

Union Wine Co Vegan Thanksgiving with a Vegan Turkey

VEGAN TURKEY – VERY GOOD BUTCHER’S STUFFED BEAST

INGREDIENTS:

1 Stuffed Beast

BASTE:

1 cup veggie stock

1/4 cup vegan butter

1 sprig each thyme and rosemary

3 cloves of garlic

salt and pepper

PREPARATION:

Make sure to thaw the beast. Remove packaging and cheesecloth.

Baste your beast to keep it nice and juicy using your favorite recipe or our very good baste.

Cook the beast uncovered on a baking pan at 350° for 45-60 minutes, basting every 15 minutes to keep everything nice and moist. Make sure the center of the beast is above 160°. Remove from the oven once nicely roasted, let cool for a few minutes, serve, and enjoy!

A Blackcurrant Cocktail 3 Ways

Underwood Wine and Current Cassis

While we’re a wine company and have an interest in all things wine, we’re always keeping our eyes open for a new liquor or liqueur brand to use to create a wine cocktail. Earlier this year we came across Current Cassis. Their beautifully subtle, classic yet modern label caught our eye immediately. Current Cassis makes a botanical blackcurrant liqueur in the Hudson Valley of New York State. Current Cassis on its own is slightly bitter, yet sweet, so… a perfect balance. There are also decent tannins that complement the wine.

Their liqueur is similar to a classic french liqueur Crème de Cassis. While none of us here at Union are trained bartenders, we went to our friend Google to see if there were any wine and crème de cassis cocktails out there. We found that there are actually several, and they are extremely simple to make. The most common and most classic cocktail is a Kir Cocktail. It is simply a pour of wine, 5-6 ounces, and a half-ounce or so of crème de cassis. There are many riffs on this cocktail and while we could have tried it with all five of our Underwood wine offerings, we chose to give it a go with Underwood Pinot Gris, The Bubbles, and Pinot Noir.

Underwood Pinot Gris Kir Wine Cocktail

Kir

1/2 ounce crème de cassis
5 to 6 ounces chilled Underwood Pinot Gris

Measure and pour crème de cassis and wine into your favorite glass, stir and enjoy.

Underwood Bubbles Kir Royal Cocktail

Kir Royale

1/2-1 ounce crème de cassis
5 to 6 ounces chilled Underwood The Bubbles

Measure and pour crème de cassis and wine into your favorite glass, stir and enjoy.

Underwood Pinot Noir Cardinal Wine Cocktail

KIR NOIR

1/2-1 ounce crème de cassis
5 to 6 ounces chilled Underwood Pinot Noir

Measure and pour crème de cassis and wine into your favorite glass, stir and enjoy.

Underwood Wine Cocktail

Grab a bottle and a few of our wines to see which combination you like best. Current Cassis is slowly making their way to the west coast, but you can find their liqueur at a handful of online retailers.

Recipes for the Last of Summer

Grilled Summer Squash with Fresh Mozzarella and Toasted Sunflower Seeds

Grilled Summer Squash with Fresh Mozzarella and Toasted Sunflower Seeds

Recipe Note:
A super simple way of dressing up the summertime staple; grilled zucchini. Perfectly smashable as a starter or side with a cold glass of Underwood Pinot Gris in hand.

Serves 6-8 as a side dish

Ingredients:
6 zucchini
3 eight oz. balls of mozzarella or burrata
1 cup toasted sunflower seeds
a handful of sunflower sprouts
edible flower petals (optional)
juice of one lemon
extra virgin olive oil
salt

Grilled Summer Squash with Fresh Mozzarella and Toasted Sunflower Seeds

Method:
Heat a grill to a medium high heat and make sure the grate is cleaned and seasoned with oil. Cut the zucchini down the center, lengthwise, and toss in a drizzle of extra virgin olive oil and a pinch of salt. Grill the zucchini, turning as needed, until they are well caramelized and tender, but not mushy. Remove from the grill and place directly on a serving platter.
Tear the balls of mozzarella with your hands into bite sized pieces and arrange on the platter with the zucchini. Sprinkle the toasted seeds over the entire dish, followed by the sunflower sprouts and flowers. Before serving, finish the platter with the freshly squeezed lemon juice and an additional blessing of extra virgin olive oil and flaky salt.


Blistered Shishito Peppers with Shaved Pecorino

Blistered Shishito Peppers with Shaved Pecorino

Recipe Note:
Blistery and sweet peppers with salty pecorino and crisp pinot gris makes for instant happy hour at home.

Serves 4 as an appetizer

Ingredients: 
½ lb (~4 cups) shishito/padron peppers
4 oz pecorino cheese
2 tablespoons extra virgin olive oil
flaky sea salt
lime or lemon wedge (optional)

Blistered Shishito Peppers with Shaved Pecorino

Method: 
Heat up a large cast iron pan to high heat. Add the extra virgin olive oil, followed by the peppers. Make sure they’re evenly dispersed in one layer. Toss the peppers in the pan every thirty seconds. It’s important to let them sit and blister between tosses, so resist the urge to stir! Once the peppers are evenly blistered and softened, remove from the pan onto a paper towel lined dish. Season with flaky salt before transferring to a serving plate/bowl. Freshly shave pecorino cheese with a vegetable peeler over the blistered peppers before serving with a lime wedge and a few glasses of pinot gris!


Maple and Whiskey Glazed Peaches for Pancakes or Waffles

Maple and Whiskey Glazed Peaches for Pancakes or Waffles

Recipe Note:
Brunch is our favorite excuse to drink before noon, and these boozy maple peaches give us even more of a reason to crack open a can of bubbles. Spoon these peaches over pancakes, on top of waffles, or even on a croissant with mascarpone. Pair with an Underwood R
osé Bubbles mimosa for the perfect Sunday brunch.

Serves 4-6 

Ingredients:
4 yellow peaches
2 tablespoons butter
4-5 ounces maple syrup
2 shot whiskey

Maple and Whiskey Glazed Peaches for Pancakes or Waffles

Method:
Slice the peaches into large chunks and set them aside. Heat a large pan to medium-high heat and add the butter, followed by the peaches. Cook the peaches, stirring occasionally, for 2-3 minutes before adding the whiskey, followed by the maple syrup. Be careful adding the whiskey as it may flambé! Allow the peaches, whiskey, and maple syrup to cook down together for a minute before removing from the heat. Let the peaches cool down a bit before serving.

Maple and Whiskey Glazed Peaches for Pancakes or Waffles

Recipes and Photography by Chef Kevin Oconnor

Beginner’s Guide to Backpacking

Backpacking Eagle Cap Wilderness

I know how intimidating and overwhelming it can feel to get started with backpacking. There are so many questions that need answering. What gear do I need? How will I stay safe? How will I know where to go?

When I first began backpacking, I dove headfirst into the longest hike of my life; the Oregon section of the PCT. I backpacked for 30 days using ill-fitting, heavy gear, paper maps, and a whole lot of extra stuff I didn’t need. My feet hurt throughout the entire trek, red, sore, and covered in blisters. But I made it and all that anguish was worth it!

I’ve learned a lot over the 6 years since that hike. I’ve been able to swap out some of my gear for more practical items and successfully spent countless nights under the stars in the mountains, in the desert, and on the coast. My objective with this post is to share some of the lessons I’ve learned from my adventures. Hopefully, it will give you the confidence to branch out beyond car camping.

Backpacking in Eagle Cap Wilderness

Before I get started, I want to clarify that this is what I’ve found works for me. Everyone is going to feel differently when they enter the backcountry, so make sure to do plenty of your own research and trial and error to figure out what you’re most comfortable with.

So if this sounds exciting to you, but you aren’t sure how to get started, I’m here to help! Here are some ways to work up to backpacking:

• Start with longer hikes! Tackle a long-distance trail and bring a heavier backpack with plenty of supplies, including extra food and water (we call this training weight). Do all the research you’ll need beforehand to complete the hike safely. You’ll feel a sense of accomplishment while training your body to carry a heavier load. It will also help familiarize you with the experience of spending several hours immersed in nature before trying it out overnight.

• If you have no experience backpacking, I recommend going with knowledgeable friends the first few times. There’s only so much you can glean from the internet. Learning directly from those who have experience will be so helpful when questions arise. And they’ll be there to back you up if you forgot to pack a crucial piece of gear. Don’t have friends who want to backpack with you? Try a local club, MeetUp.com, or reach out to like-minded folks on social media.

Underwood Wine Cheers

• Before you invest in your own backpacking gear, try borrowing from a friend or renting from an outdoor store. This will help you narrow down what kind of gear you like best and will ensure that you’re well equipped with knowledge and experience when you do finally purchase the items you need. There’s also plenty of used gear shops out there for those with a tighter budget. REI has a whole used gear section on their website. This is the perfect way to get started while simultaneously keeping used gear out of our landfills.

The most important step you can take to prepare for your first backpacking experience is to do a lot of research. Knowledge is so empowering and the more you have, the more comfortable you will feel in the backcountry.

One creative option is to take an online or in-person class on backpacking. For example, REI teaches many outdoor skills classes, including topics in navigation, survival basics, women’s wilderness skills, and First Aid. They also have local backpacking trips in many cities across the US for those who’d prefer to learn from experts on multi-day trips. This is also a great option if you’re looking for new like-minded friends to go backpacking with.

Backpacking trip by a lake

When choosing a location for your first trip, start with a fairly easy, low mileage trail and only stay out one night. That way you won’t be far from your car if you forget a crucial piece of gear. Starting easy and working your way up to longer and more difficult treks is perfectly normal. And there are plenty of short trails with beautiful views! It may just mean a little less solitude.

If you’re not sure how to find trails near you, I suggest using the AllTrails app downloaded directly to your phone. There’s both an unpaid and paid version. There are benefits to the paid version, like the ability to download maps that you can follow while you hike, but the free version works great as well and you can still often view the maps offline. This app will help you figure out what trail will suit you best. It lists the length and elevation gain of each trail. Plus, people write helpful reviews on trail conditions and campsite locations.

Once you decide on a trail, google the nearest ranger station and give them a call before you depart. They might have more recent information about trail closures, permits, wildfire restrictions, and conditions that you won’t find on the internet.

Wallow Whitman National Forest Backpacking

Start your hike early in the morning. Getting an early start will allow you to take your time getting to your destination and will most likely give you the chance at the first pick of the best campsites. That way you’ll have the rest of the day to play and enjoy the gorgeous views.

Safety in the Backcountry

Have you heard of the 10 essentials? Carrying these items with you every time you step into the backcountry is so important, even on short day hikes. And knowing how to use them will be incredibly valuable if you ever get yourself into a bind. They could save your life.

Backpacking Essentials What to Pack

The Ten Essentials:
• Navigation: map, compass, altimeter, GPS device, personal locator beacon (PLB), or satellite messenger.
• Headlamp and extra batteries
• Sun Protection: sunglasses, sun-protective clothes, and sunscreen
• First Aid: including band-aids, ointment, and insect repellent
• Knife: and gear repair kit
• Fire: matches, lighter, tinder, and/or stove
• Shelter: carried at all times (even as simple as an emergency bivy)
• Extra Food
• Extra Water
• Extra Clothing

Having a whistle could save your life if you accidentally slip, fall, or are rendered immobile in any way. Many backpacks have them attached to the shoulder straps, but you can also purchase one separately. Experts advise keeping it around your neck, in case you’re separated from your pack. 3 loud blasts, each lasting about 3 seconds, is the universal call for help.

I always carry an extra iPhone battery charger with me. Smartphones aren’t only good for taking amazing photos and videos of your travels, they double as navigation, map storage, and potential call for rescue. The last thing you want is for your phone to die on the trail when you need it most.

Always be sure to tell someone where you’re going and when you plan to be back. Supply them with the phone number for the nearest Ranger Station and let them know at what point they should be worried enough to call.

As stated earlier, always be sure to know what your selected trail conditions will be like and check the weather forecast before you go. Knowing what to expect, in terms of weather, will give you the information you need when you’re packing for your trip. But it’s also important to “expect the unexpected.” So even if the forecast isn’t predicting rain, I’ll stuff a raincoat into my pack just in case the weather turns. This can happen frequently in the mountains, so it’s best to be prepared.

What to Pack

Having the right gear for your trip is essential, but don’t get too hung up on the fancy stuff! Expensive gear can be a huge barrier for a lot of people. But there’s absolutely nothing wrong with borrowing from friends, finding used gear, or starting with the less expensive, but probably slightly heavier stuff. When I started, everything I brought with me was used. Over several years, I slowly replaced the vintage items with more lightweight ones. It’s ok to start wherever you are. The most important part is knowing how to use what you have.

It’s really helpful to have a physical list and cross items off as you go. That way, you won’t get stuck without a crucial piece of gear when you’re miles away from town.

REI has this super helpful and comprehensive backpacking checklist that you can download and print out at home.

In order to determine what you need to pack, however, you’ll have to consider several factors, including how far you’re going, what kind of weather you’re expecting, how long you’ll be out for, and what kind of terrain you’ll be crossing.

Here are some items I deem essential:

Backpacking tent

A One-Person Tent (unless sharing with a friend):
I recommend using a one-person tent to keep your pack weight down. However, if you have a dog or you prefer something roomier, you might want to consider a two-person tent. I use a Nemo Hornet 1 Tent, because it feels spacious enough for me and my pup, it’s easy to set up, and it packs down small.

Stove:
A stove is a great item to share with a friend to keep weight down. But you can also bring your own. I have the MSR Reactor Stove because it performs well in snowy conditions. But this might be overkill for the casual summer backpacker. There are several lightweight, less expensive options to choose from as well. Jetboils are a popular option amongst backpackers.

PLB’s and Satellite Messengers:
My Garmin InReach Mini is my most valued piece of gear. It gives me an added sense of security whenever I’m outside of cell range. I often use it to text my parents my location when I arrive at camp. Just knowing that someone else has my exact location gives me that extra peace of mind. I also love that I can check the updated weather forecast whenever I need to.

However, these devices can be quite pricey. If you don’t have the funds to invest in an emergency device right now, don’t let that keep you from going. Just make sure someone knows where you’re heading.

First Aid:
It’s important to always hike with some form of first aid. Even on short day hikes, I carry a handful of these items. You can buy a readymade kit or build your own. I’ve been using the same first aid kit for a few years now, and I simply replace the items as I use them.

The items you bring will largely be dependent on where you’re going and what time of year it is. You’ll want bug repellent in the mountains during summer, for example. I always like to stash away some extra ibuprofen as well, to soothe my sore muscles at night.

Self-Protection:
I bring SABRE Frontiersman Bear Spray with me on my solo hiking and backpacking trips. This is my preferred method of self-protection. Keep it somewhere easily accessible and know how to use it before you go.
Another option would be to carry a more standard pepper spray, like SABRE RED Tactical Pepper Gel. If you aren’t hiking through bear country, a spray of this strength would be perfectly suitable.

Underwood Wine in a lake

Underwood Wine:
No backpacking adventure would quite be complete without a delicious can of Underwood Wine to reward yourself with after a long day. Just chill your beverage in the nearest spring-fed river or alpine lake and wait!

Ok, now that you’ve made it to your destination and set up camp, what do you do with the rest of the day? This is my favorite part of the trip and it’s so full of possibilities!

A few fun ways you could spend your afternoon:
• Take an exploratory side hike. Pack an extra small backpack. It can easily double as a stuff sack for clothing and will provide you with a small pack to take with you on those fun afternoon explorations. Fill it with snacks, a water bottle, your camera and you’re good to go!
• Sit and read a book or Kindle in the sun all day. This is my favorite afternoon activity. I use a Kindle because it’s so lightweight, low profile, and means you can carry multiple books!

• Tie up a hammock and nap the afternoon away while you listen to the birds chirp.
• Listen to music or podcasts downloaded on your phone. Just be sure to download everything you might want to listen to while you’re still in cell range.
• Draw or paint your surroundings! Bring a small sketchbook and a set of paints or pencils and practice your art skills in an inspiring location.
• Bring a set of cards and play games with your friends or solitaire by yourself.
• Pop open that can of Underwood, cheers your friend, and watch the sun slowly dip behind the mountains.

Leave No Trace:

Lastly, some of the most pertinent information you can familiarize yourself with is the 7 Leave No Trace Principles. Make sure to educate yourself on these practices and understand the “why” behind them. Mother Nature, local wildlife, and your fellow hikers will thank you.

You can find more in-depth information here at lnt.org.

Now get out there and enjoy!

Brooke Weeber Backpacking Trip Tent by Lake

Photography and story by Brooke Weeber